Showing posts with label blogger widgets. Show all posts
Wednesday 5 June 2013
How to add Retro Style Social Sharing Widget For Blogger
 Blogger is a platform to make website and fully customize using CSS and HTML.This is another Social Sharing Widget for blogger.Name of this widget is Retro Style.I mentioned in old posts Social media is very advance and maybe many traffic from there.Everyone want to get more traffic and promote website.Now using some simple steps and get this beautiful widget.Blogger Design is count in for SEO.This widget makes your blog more beautiful and attractive for visitors and readers.you can easily add in blog sidebar or any where you want.One thing is more Facebook,Twitter,Rss,Pinterest and Google plus buttons are including in widget.So it's up to you.Now Follow the following steps for add Retro Style Widget.
 You May Like To Read:
- Touch Me Sharing Widget For Blogs/Blogger
- Add Angry Birds Social Sharing Widget To Blogger
- How To Add Subscribe Box To Blogger /Website
- Cool Email Subscription Widget With Social Media Buttons For Blogger
How to add Retro Style Social Sharing Widget For Blogger
- Go to Blogger dashboard
- Layout >> Add a Gadget >> HTML/Javascript Box.
- Paste the following code in the HTML/Javascript Box.
<style>
/* www.bloggerwidget4u.blogspot.com */
.bubblewrap{
list-style-type:none;
margin:0;
padding:0;
}
.bubblewrap li{
display:inline;
width: 60px;
height:60px;
}
.bubblewrap li img{
width: 50px; /* width of each image.*/
height: 50px; /* height of each image.*/
border:0;
margin-right: 4px; /*spacing between each image*/
-webkit-transition:-webkit-transform 0.1s ease-in; /*animate transform property */
-o-transition:-o-transform 0.1s ease-in; /*animate transform property in Opera */
}
.bubblewrap li img:hover{
-moz-transform:scale(1.8); /*scale up image 1.8x*/
-webkit-transform:scale(1.8);
-o-transform:scale(1.8);
}</style>
<br />
<center>
<br />
<ul class="bubblewrap">
<li><a href="http://www.plus.google.com/113035760861815543895"><img src="http://2.bp.blogspot.com/-LffgfsHnAj0/UPwQ23I0QAI/AAAAAAAAGas/-0InJDs-Cew/s1600/bloggertrix-google-icon.png" title="Add to Facebook" /></a></li>
<li><a href="http://www.facebook.com/Mr.FarhanKayani"><img src="http://2.bp.blogspot.com/-7w_IO2RiuAE/UPwQ2SXEnYI/AAAAAAAAGak/6PxOch3eQ44/s1600/bloggertrix-facebook-icon.png" title="Add to Facebook" /></a></li>
<li><a href="http://www.pinterest.com/#/"><img src="http://3.bp.blogspot.com/-1otZEseg04g/UPwUW46qq-I/AAAAAAAAGbk/ycvQIf9iKdI/s1600/bloggertrix-pinterest-icon.png" title="Add to Digg" /></a></li>
<li><a href="http://www.twitter/farhankayani143"><img src="http://2.bp.blogspot.com/-3x7cybjuGY0/UPwQ3_mdIKI/AAAAAAAAGa0/2S7L05Wssv4/s1600/bloggertrix-twitter-icon.png" title="Add to Twitter" /></a></li>
<li><a href="http://feeds2.feedburner.com/bloggerwidget4u"><img src="http://3.bp.blogspot.com/-4JDhfVVlW1U/UPwQ2iEcPtI/AAAAAAAAGao/kDO6rfj_-sg/s1600/bloggertrix-rss-feed-icon.png" title="Add RSS Feed" /></a></li>
</ul>
- And at the end After paste above codes,replace my account ID's to your account ID's
Change 113035760861815543895 to your Google plus ID.
Change Mr.FarhanKayani to your fan page or your Facebook profile user name.its up to you.
Change# to your Pinterest Username.
Change farhankayani143 to your Twitter Username.
Change bloggerwidget4u to your Feedburner username.
- And click on Save.
- After save view blog.
If you face any Problem leave a comment at the end of post.
How To Add New Contact Us Form In Blogger?

In my old post How To Add Wikipedia Search Box To Blogger I mentioned Google officials ,continuously working on blogger platform to upgrade more gadgets.Yes one new widget added by Blogger.Added new and simple contact form to the gadgets,section.You can easy add this contact form to your blogger below posts, sidebar or anywhere you want.If you receive good traffic on blog then many readers want to contact with you about any thing his requirements.This form consist 3 fields which filled by the Visitors.Three fields are Name,Email and Message.Email and Message is require.Now you can add Contact Us Form by using given below steps.And guide you with using screen shots. I sure that you easily add this form.
Follow given Steps To Add Contact Form In Blogger
- Go to Blogger dashboard >>
- Layout >>Add a Gadget Show in given below Screenshot

- Now Click on "More Gadgets"
- And find "Contact Form" and click on the Contact Form and click Save.
- You Almost Done.See Below Screen Shot.

It will be added automatically to your blog sidebar, and then you can easily drag it anywhere you want.It's upto you.And at the end see live demo below Picture.
Yes I forget Just for testing you can send message and message will send in your blogger account on which you are running your site.Ok
Don't Forget and Take 5 seconds and share this article with Friends and make us Happy.That's All
Sunday 7 April 2013
How to Add Wikipedia Search Box to Blogger ~ Widget 2013

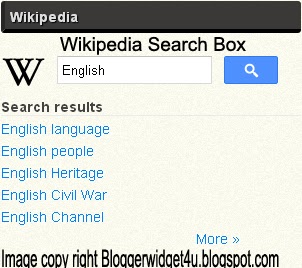
Google officials ,continuously working on blogger platform to upgrade more gadgets.Now I am going to tell you about a widget recently created by blogger officials.Let me Explain Wikipedia is the free encyclopedia site which is use to find about history, scientific thing i mean to say Wikipedia is use for search topics with complete details for every Subject like Physics,Chemistry,biology,English and Urdu etc.Everyone Know Wikipedia is second Most Widely used Search Engine in the world.In this Tutorial i am tell you blogger officials recently created a new official Blogger Wikipedia Search Box widget .In the World Many Educational Blogs I Recommendation they having educational blogs, you must add this Widget in to Blog For Your blog readers because it helps to your Readers to find some thing unique inside your site.Now i am Going to tell you How to add Wikipedia Search Box to Blogger? You can easily add this Wikipedia Search Box to your blogger sidebar.
Don't Miss:New Facebook Pop Up Like Box For Blogger 2013
Don't Miss:How To Add Floating Facebook Like Box In Blogger?
Take 5 seconds and share this article with Friends and make us Happy.That's All
Don't Miss:New Facebook Pop Up Like Box For Blogger 2013
Don't Miss:How To Add Floating Facebook Like Box In Blogger?
How to Add Wikipedia Search Box to Blogger
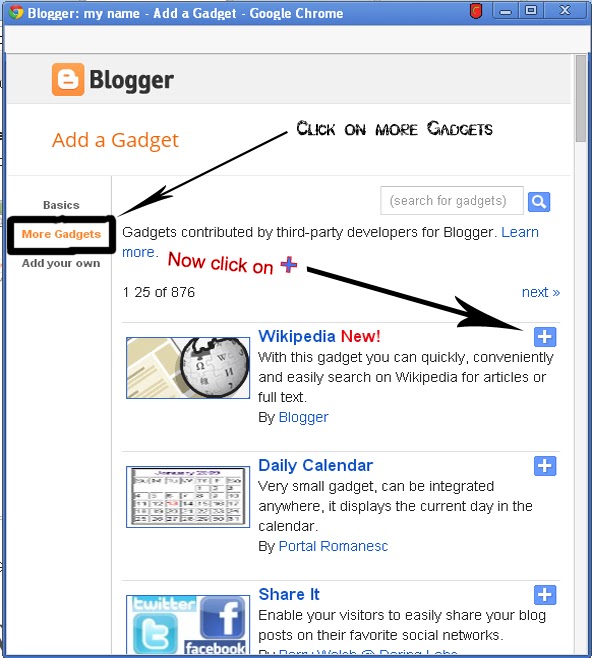
- Go to Blogger dashboard >> Layout >> Add a Gadget >>
- Now Click on "More Gadgets"
- And find "Wikipedia " and click on the + and click Save.
- You Almost Done.
- See Below Screen Shot.

- Wikipedia Search Box to Blogger Live Demo in Below Picture.
Take 5 seconds and share this article with Friends and make us Happy.That's All
Thursday 28 March 2013
How To Add Subscribe Box to Blogger /website

How To Add Subscribe Box to Blogger? In this post i will tell to you how to increase your visitor to subscribe via RSS. Basically Rss services is let's your blog visitor like you blog posts and contents. and visitor want to read your posts through RSS news then they subscribe you via RSS.If Visitors Subscribe you then increase your blog pageviews. One thing is more in Subscribe Box with social media webs.(Digg,Twitter,Facebook,Stumbleupon,Delicious).Social networking is best to attract visitors to your website for read your contents and also How to Keep Visitors at Your Site Longer? Now Add this Email Subscription Form to your website in your blog sidebar and make your sidebar beautiful and more attractive.If you are Want to add this Widget then Follow the steps given below.
You May Like To Read:
- Create a Cute E-mail Subscription Form.
- How to add Animated Social Sharing Widget With Cool Hover Effects.
- Touch me sharing widget for blogs/blogger.
- How To Remove Powered By Blogger from blog?
- New Facebook Pop Up Like Box for Blogger 2013.
- Cool Email Subscription Widget With Social Media Buttons For Blogger.
How to Add Subscribe Box to Blogger /website.
- Go to Blogger Dashboard >> Layout >> Add a Gadget >> HTML/Javascript Box.
- Paste the following code in the HTML/Javascript Box.
- And click on Save.
<style type="text/css">
#subscribe-box {
overflow: hidden;
margin: 10px 0 0 0;
}
#subscribe-box a.subscribe-sec {
display: inline-block;
display: -moz-inline-stack;
width: 40px;
padding-top: 38px;
zoom: 1;
}
#subscribe-box a.subscribe-sec:hover {
color: #660000;
}
</style>
<form action="http://feedburner.google.com/fb/a/mailverify" style="border:1px solid #ccc;padding:3px;" target="popupwindow" method="post" onsubmit="window.open('http://feedburner.google.com/fb/a/mailverify?uri=FEEDBURNER-ID', 'popupwindow', 'scrollbars=yes,width=550,height=520');return true"><p>Get Notified When We Update !!!</p><p><input style="width:180px" name="email" type="text" value="Enter your email address:" onclick="this.value='';" /><input value="FEEDBURNER-ID" name="uri" type="hidden" /><input value="en_US" name="loc" type="hidden" /><input value="Subscribe" type="submit" /></p>
<p><div id="subscribe-box">
<a title="Delicious" href="http://delicious.com/DELICIOUS-USERNAME" class="subscribe-sec" style="background: url(http://1.bp.blogspot.com/_T46SliM0-PI/TB2Wrb1EuNI/AAAAAAAAAZQ/XCYsv5xhrFY/s1600/delicious.png) center top no-repeat"></a>
<a title="Twitter" href="http://twitter.com/TWITTER-USERNAME" class="subscribe-sec" style="background: url(http://3.bp.blogspot.com/_T46SliM0-PI/TB2WqtxRIMI/AAAAAAAAAZI/7INQ-HwZQo4/s1600/twitter.png) center top no-repeat"></a>
<a title="Digg" href="http://digg.com/users/DIGG-USERNAME" class="subscribe-sec" style="background: url(http://1.bp.blogspot.com/_T46SliM0-PI/TB2WrnJnupI/AAAAAAAAAZY/qgLCPjkY7xQ/s1600/digg.png) center top no-repeat"></a>
<a title="Facebook" href="http://www.facebook.com/FACEBOOK-USERNAME" class="subscribe-sec" style="background: url(http://2.bp.blogspot.com/_T46SliM0-PI/TB2WsA5-GWI/AAAAAAAAAZg/llckeiIzHBA/s1600/facebook.png) center top no-repeat"></a>
<a title="Stumbleupon" href="http://www.stumbleupon.com/stumbler/STUMBLEUPON-USERNAME" class="subscribe-sec" style="background: url(http://3.bp.blogspot.com/_T46SliM0-PI/TB2W0KunsvI/AAAAAAAAAZw/2UZpjpyBE5s/s1600/stumbleupon.png) center top no-repeat"></a>
<a title="RSS Feed" href="http://feeds.feedburner.com/FEEDBURNER-ID" class="subscribe-sec" style="background: url(http://4.bp.blogspot.com/_T46SliM0-PI/TB2WsfPjsZI/AAAAAAAAAZo/LOPvME3a_mA/s1600/rss.png) center top no-repeat"></a>
</div></p>
</form>
Customization:
- Replace "FEEDBURNER-ID" with your feedburner ID.
- Replace "DELICIOUS-USERNAME" with your delicious username.
- Replace "TWITTER-USERNAME" with your twitter username.
- Replace "FACEBOOK-USERNAME" with your facebook username.
- Replace "STUMBLEUPON-USERNAME" with your stumbleupon username.
- Replace "DIGG-USERNAME" with your digg username.
- Get Notified When We Update !!! Change with your Text.
That's All.
Tuesday 19 March 2013
Add Angry Birds Social Sharing Widget To Blogger

You May Like To Read:
- Create a Cute E-mail Subscription Form.
- How to add Animated Social Sharing Widget With Cool Hover Effects.
- Touch me sharing widget for blogs/blogger.
- Add Flying Letters below Mouse Pointer Animation.
- How To Remove Powered By Blogger from blog?
- New Facebook Pop Up Like Box for Blogger 2013.
How to Add Angry Birds Social Sharing Widget To Blogger?
- Go to Blogger Dashboard >> Layout >> Add a Gadget >> HTML/Javascript Box.
- Paste the following code in the HTML/Javascript Box.
- And click on Save.
<style>Note: Replace Bold text URL's with your own social profile links.
.bubblewrap{
list-style-type:none;
margin:0;
padding:0;
}
.bubblewrap li{
display:inline;
width: 60px;
height:60px;
}
.bubblewrap li img{
width: 50px; /* width of each image.*/
height: 50px; /* height of each image.*/
border:0;
margin-right: 4px; /*spacing between each image*/
-webkit-transition:-webkit-transform 0.1s ease-in; /*animate transform property */
-o-transition:-o-transform 0.1s ease-in; /*animate transform property in Opera */
}
.bubblewrap li img:hover{
-moz-transform:scale(1.8); /*scale up image 1.8x*/
-webkit-transform:scale(1.8);
-o-transform:scale(1.8);
}
</style>
<ul class="bubblewrap">
<li><a href="https://plus.google.com/100052689605336447119" rel='nofollow' target='_blank'><img src="http://3.bp.blogspot.com/-b3-ImgxoXZE/ULTdqlQ4TYI/AAAAAAAAF2g/pBhTwnttAKY/s1600/bloggertrix-googleplus.png" title="Add to Facebook" /></a></li>
<li><a href="http://www.facebook.com/bloggerwidget4u" rel='nofollow' target='_blank'><img src="http://4.bp.blogspot.com/-PL55Jd1MIgw/ULTdpgxpthI/AAAAAAAAF2Y/zqic5hvj2BU/s1600/bloggertrix-facebook.png" title="Add to Facebook" /></a></li>
<li><a href="YOUR youtube LINK " rel='nofollow' target='_blank'><img src="http://4.bp.blogspot.com/-RlxdrBe4ecs/ULTduDJX5gI/AAAAAAAAF24/Pc03FWKq8js/s1600/bloggertrix-youtube.png" title="Add to Youtube" /></a></li>
<li><a href="http://www.twitter/farhankayani143" rel='nofollow' target='_blank'><img src="http://3.bp.blogspot.com/-NjAWTWrlX5E/ULTdtCeqFeI/AAAAAAAAF2w/sLBX0ttP1rE/s1600/bloggertrix-twitter.png" title="Add to Twitter" /></a></li>
<li><a href="http://feeds2.feedburner.com/bloggerwidget4u" rel='nofollow' target='_blank'><img src="http://1.bp.blogspot.com/-Cy7I8qvNDg0/ULTdoi-T18I/AAAAAAAAF2Q/qPyAZfmRqU8/s1600/bloggertrix-Rss.png" title="Add RSS Feed" /></a></li>
</ul>
That's All
Note:This widget originally Credit by Gagan Masoun from blogsdaddy .
Saturday 16 March 2013
Touch me sharing widget for blogs/blogger
Hi! to I am going to share another social media widget. I have share Many Tricks About Blogger.Like Social Sharing Widget With Cool Hover Effects.Create a Cute E-mail Subscription Form ETC .But today about "Touch me" sharing widget for blogs/blogger.This widget have facebook Twitter,Google Plus and Rss sharing buttons .Facebook is best Social Media Website and after Facebook Twitter is most Popular Web.and another Social Media site that is Google Plus.If you want to add this widgets in your blog than follow the following steps.
How to Add "Touch me" sharing widget for blogs/blogger?
- Go to Blogger dashboard >> Layout >> Add a Gadget >> HTML/Javascript Box.
- Paste the following code inside the HTML/javascript Box.
<style>
/*--------Touch Me Sharing Widget ------*/
.touchme a {
display:block;
height:50px;
width:50px;
padding:0 4px;
float:left;
background:transparent url(https://farhankayni.googlecode.com/files/Sharing%20Touch%20Me.png) no-repeat;
-webkit-transition: ease-in 0.2s all;
-moz-transition: ease-in 0.2s all;
-o-transition: ease-in 0.2s all;
-ms-transition: ease-in 0.2s all;
transition: ease-in 0.2s all;
cursor:pointer;}
.touchme a.googleplus {
background-position: 0px -58px;}
.touchme a.googleplus:hover {
background-position: 0px 0px;
}
.touchme a.twitter {
background-position: 0px -290px;}
.touchme a.twitter:hover {
background-position: 0px -232px;}
.touchme a.facebook {
background-position: 0px -406px;}
.touchme a.facebook:hover {
background-position: 0px -348px;}
.touchme a.rss {
background-position: 0px -174px;}
.touchme a.rss:hover {
background-position: 0px -116px;}
</style>
<div class='touchme'><!--RSS-->
<a class='rss' href="YOUR RSS LINK" rel='external nofollow' target='_blank'></a><!--Google Plus-->
<a class='googleplus' href="YOUR GOOGLE PROFILE LINK" rel='external nofollow' target='_blank'></a><!--Facebook-->
<a class='facebook' href="YOUR FACEBOOK LINK" rel='external nofollow' target='_blank'></a><!-- Twitter -->
<a class='twitter' href="YOUR TWITTER LINK" rel='external nofollow' target='_blank' ></a>
</div>
Customization:
- Replace YOUR RSS LINK with your Feed burner link.
- Replace YOUR GOOGLE PROFILE LINK with your Google+ URL
- Replace YOUR FACEBOOK LINK with your Facebook URL
- Replace YOUR TWITTER LINK with your Twitter Profile URL
- And click on save.
Note:This widget originally Credit by Umar Irshad from Design Kindle.
Monday 11 March 2013
Cool Email Subscription Widget With Social Media Buttons For Blogger

To Day I am share a Widget for blogger. Add a Beautiful Email subscription widget.A cool subscription widget attract visitor and make your blog more Beautiful.This widget also have Social media buttons like Twitter,Google Plus,Rss etc.Facebook is best Social Media Website and after Facebook Twitter is most Popular Web.and another Social Media site that is Google Plus.In this Cool Email Subscription Widget With Social Media Buttons like Twitter button and Google Plus button. If you Want to add this Widget in your blog than Follow the Following Steps.
How to Add cool Email Subscription Widget With Social Media Buttons?
Go to Blogger dashboard >> Layout >> Add a Gadget >> HTML/Javascript Box.
<style>#salahuddin-ayubi {
border: 0;
margin-bottom: 10px;
margin: 0 auto;
width:300px;
}
#email-news-subscribe .email-box{
padding: 5px 5px;
font-family: "Arial","Helvetica",sans-serif;
height:38px;}#email-news-subscribe .email-box input.email{
background:#FFFFFF;
border: 1px solid #dedede;
color: #999;
padding: 7px 10px 8px 10px;
-moz-border-radius: 3px;
-webkit-border-radius: 3px;
-o-border-radius: 3px;
-ms-border-radius: 3px;
-khtml-border-radius: 3px;
border-radius: 3px;
border-image: initial;
font-family: "Arial","Helvetica",sans-serif;}#email-news-subscribe .email-box input.email:focus{color:#333}
#email-news-subscribe .email-box input.subscribe{
background: -moz-linear-gradient(center top,#666 0,#333 100%);
background: -webkit-gradient(linear,left top,left bottom,color-stop(0,#666),color-stop(1,#333));
font-family: "Arial","Helvetica",sans-serif;
border-radius:3px;
-moz-border-radius:3px;
-webkit-border-radius:3px;
border:1px solid #333;
color:white;
padding:7px 14px;
margin-left:3px;
font-weight:bold;
font-size:12px;
cursor:pointer;
border-image: initial;}
#email-news-subscribe .email-box input.subscribe:hover{
background-image:-moz-linear-gradient(top,#333,#666);
background-image:-webkit-gradient(linear,left top,left bottom,from(#333),to(#666));
filter:progid:DXImageTransform.Microsoft.Gradient(startColorStr=#ffffff,endColorStr=#ebebeb);
outline:0;-moz-box-shadow:0 0 3px #999;
-webkit-box-shadow:0 0 3px #999;
box-shadow:0 0 3px #999
-pie-background:linear-gradient(270deg,#ffda4d,#ff9b00);
border-radius:3px;
-moz-border-radius:3px;
-webkit-border-radius:3px;
border:1px solid #333;
color:#FFFFFF;
}
#other-social-bar {
padding: 0px;
overflow: hidden;
height:37px;
margin-top:-8px;
}#other-social-bar ul {list-style: none outside none; padding-left: 4px;}
#other-social-bar .other-follow {
float: left;
overflow: hidden;
padding:5px;
width: 270px;}#other-social-bar .other-follow ul {
list-style: none outside none;
padding-left: 4px;}#other-social-bar .other-follow li {
display:inline;
border:0;
}
#other-social-bar .other-follow li a {
font-size: 12px;
color:#666;
font-weight: bold; font-family:arial;
display:inline;
}
#other-social-bar .other-follow li.my-rss {
background: url('http://3.bp.blogspot.com/-sR72SM_Wets/TwHZG9y4hXI/AAAAAAAAFv8/0bP2R3Qkl8c/s400/rss-16x16.png') no-repeat transparent;
line-height: 1;
padding: 0px 3px 1px 20px;
width: 60px;
margin-bottom:0px;
margin-left:5px;}
#other-social-bar .other-follow li.my-rss a, #other-social-bar .other-follow li.my-twitter a, #other-social-bar .other-follow li.my-gplus a{
text-decoration:none;
}
#other-social-bar .other-follow li.my-rss a:hover, #other-social-bar .other-follow li.my-twitter a:hover, #other-social-bar .other-follow li.my-gplus a:hover{
text-decoration:underline;
}
#other-social-bar .other-follow li.my-twitter {
background: url('http://2.bp.blogspot.com/-KsALKRN7Zzo/T0vKkSG3AfI/AAAAAAAAF_k/l-VHD5xxzps/s400/twitter%2527.png') no-repeat transparent;
line-height: 1;
padding: 0px 3px 1px 20px;
width: 60px;
margin-bottom:0px;}
#other-social-bar .other-follow li.my-gplus {
background: url(http://4.bp.blogspot.com/-cC729VpBxrk/TwHZE71ZgoI/AAAAAAAAFvk/_UMyIgA8vj8/s400/gplus-16x16.png) no-repeat transparent;
line-height: 1;
width: 60px;
padding: 0px 3px 1px 20px;
margin-bottom:0px;}
.emailicon {
background: url("http://3.bp.blogspot.com/_7wsQzULWIwo/Sty6EvZmTlI/AAAAAAAACGU/ArK94-9iDS0/s400/MBT-RSS-FEED.gif") no-repeat scroll 0px 2px transparent;
padding: 0px 20px 0px 95px;
min-height:100px;
margin: 0px;
width: 183px;
line-height: 20px;
vertical-align: middle;
font-size: 14px;
color: rgb(51, 51, 51);}
.emailicon p {
color:#FF8604;
font-size: 20px;
font-weight: normal;
font-family: impact;
padding:40 0px 10px 0px;
margin:0;
padding-top: 20px;
line-height: 25px;
text-shadow: 0px 1px 0px #fff, 0px 2px 0px #C6C6C6;}</style><!--[if IE]>
<style>
#email-news-subscribe .email-box input.subscribe{
background: #333;
}
</style>
<![endif]--><div id="salahuddin-ayubi" ><div class="emailicon"><p>Subscribe to our Free Email Updates! </p></div><div id="email-news-subscribe"><div class="email-box"> <form action="http://feedburner.google.com/fb/a/mailverify" method="post" target="popupwindow" onsubmit="window.openundefined'http://feedburner.google.com/fb/a/mailverify?uri=tntbystc', 'popupwindow', 'scrollbars=yes,width=550,height=520');return true"><input gtbfieldid="10" class="email" type="text" style="width: 160px; font-size: 12px;" id="email" name="email"value="Enter your email here..." onblur="if (this.value == '') {this.value = 'Enter your email here...';}" onfocus="if (this.value == 'Enter your email here...') {this.value = '';}" type="text" /><input type="hidden" value="tntbystc" name="uri" /> <input type="hidden" name="loc" value="en_US" /> <input class="subscribe" name="commit" type="submit" value="Subscribe" /> </form> </div> </div><div id="other-social-bar"><ul class="other-follow">
<li class="my-rss"> <a rel="nofollow" title="RSS" href="http://feeds.feedburner.com/tntbystc" target="_blank">RSS Feed</a> </li><li class="my-twitter"> <a rel="nofollow" title="twitter" rel="author" href="http://twitter.com/farhankayani143" target="_blank">Twitter</a> </li><li class="my-gplus"> <a rel="nofollow" title="Google Plus" rel="author" href=https://plus.google.com/u/0/100052689605336447119target="_blank">Google Plus</a> </li>
</ul>
</div></div>
- Replace tntbystc with your Feedburner title.
- Replace the bolded sections with your twitter and Google+ username details.
How to Add Animated Flying Twitter Bird Widget to Blogger ?

To day i am share a Widget post about animated flying Twitter bird.Because Twitter is most popular social networking site after fb.and Also it is easy to apply.Many Blogs Use this widget to get more traffic to their Blog.This is Great Way to increase your twitter followers.Now If you want to add this Cute Widget on Your blog.follow the following steps.
How to Add Cute Flying Twitter Bird Widget to Blogger ?
- Go to Blogger Dashboard.
- Now Go to Template >> Edit Html.
- And Find</body> tag inside your template using (CTRL+F.)
- And Paste the Below Code Above</body>.
- Save your Template.
<!-- Twitter Bird Widget for Blogger by Technouniversity --> <script type="text/javascript" src="http://technouniversityworldjavascript-testing.googlecode.com/files/tuwtwitterbird.js"> </script> <script type="text/javascript"> var twitterAccount = "farhankayani143"; var tweetThisText = " <data:blog.pageTitle/> : <data:blog.url/> "; tripleflapInit(); </script> <span style="font-size:11px;position:absolute;"><a title='Blogger Widget by TUW' href="http://raimohsin1.blogspot.com" target='_blank'>Tricks and Tips</a></span> <!-- Twitter Bird Widget for Blogger by computer entertainment-->
Customization:
Change My Twitter Username With Your Username That's It.
Note:This widget originally share by rai mohsin.
Subscribe to:
Posts (Atom)


 I'm
I'm